This site is from a past semester! The current version is here.
CS2113/T Aug '19
  • Week 1 [Aug 12]
  • Week 2 [Aug 19]
  • Week 3 [Aug 26]
  • Week 4 [Sep 2]
  • Week 5 [Sep 9]
  • Week 6 [Sep 16]
  • Week 7 [Sep 30]
  • Week 8 [Oct 7]
  • Week 9 [Oct 14]
  • Week 10 [Oct 21]
  • Week 11 [Oct 28]
  • Week 12 [Nov 4]
  • Week 13 [Nov 11]
  • Textbook
  • Admin Info
  • Report Bugs
  • Slack
  • Forum
  • Project Info
  • Instructors
  • Announcements
  • File Submissions
  • Tutorial Schedule
  • Duke
  • Project Phase1 Dashboard
  • Java Coding Standard
  • samplerepo-things
  • Projects List
  • config.json templates for Reposense
  • PersonalAssistant-Duke
  • Project Phase2 Dashboard
  • Reference project - Addressbook
  • Repl.it classroom
  • Previous WeekNext Week

    Week 4 [Sep 2]

    • [W4.1] OOP: Polymorphism

       Polymorphism

    • [W4.1a] Paradigms → OOP → Polymorphism → What

    • [W4.1b] Paradigms → OOP → Inheritance → Overriding

    • [W4.1c] C++ to Java → Inheritance → Polymorphism

       Abstract Classes

    • [W4.1d] Paradigms → OOP → Inheritance → Abstract Classes and Methods

    • [W4.1e] Tools → UML → Class Diagrams → Abstract Classes → What

    • [W4.1f] C++ to Java → Inheritance → Abstract Classes and Methods

       Interfaces

    • [W4.1g] Paradigms → OOP → Inheritance → Interfaces

    • [W4.1h] Tools → UML → Class Diagrams → Interfaces → Interfaces

    • [W4.1i] C++ to Java → Inheritance → Interfaces

    • [W4.2] Generics in Java
    • [W4.2a] C++ to Java → Generics → What are Generics?

    • [W4.2b] C++ to Java → Generics → How to use Generics

    • [W4.3] Java Collections
    • [W4.3a] C++ to Java → Collections → The Collections Framework

    • [W4.3b] C++ to Java → Collections → The ArrayList Class

    • [W4.3c] C++ to Java → Collections → The HashMap Class

    • [W4.4] RCS: Workflows

       Branching

    • [W4.4a] Project Management → Revision Control → Branching

    • [W4.4b] Tools → Git and GitHub → Branch

       Merge conflicts

    • [W4.4c] Tools → Git and GitHub → Merge Conflicts

       Pull requests

    • [W4.4d] Tools → Git and GitHub → Create PRs

    • [W4.4e] Tools → Git and GitHub → Manage PRs

       Workflows

    • [W4.4f] Project Management → Revision Control → DRCS vs CRCS

    • [W4.4g] Project Management → Revision Control → Forking Flow

    • [W4.4h] Tools → Git and GitHub → Forking Workflow

    • [W4.4i] Project Management → Revision Control → Feature Branch Flow

    • [W4.4j] Project Management → Revision Control → Centralized Flow

    • [W4.5] Regression testing of text UIs
    • [W4.5a] Quality Assurance → Testing → Introduction → What

    • [W4.5b] Quality Assurance → Testing → Regression Testing → What

    • [W4.5c] Quality Assurance → Testing → Test Automation → What

    • [W4.5d] Quality Assurance → Testing → Test Automation → Automated Testing of CLI Apps


    [W4.1] OOP: Polymorphism


    Polymorphism

    W4.1a Paradigms → OOP → Polymorphism → What

    Can explain OOP polymorphism

    Polymorphism:

    The ability of different objects to respond, each in its own way, to identical messages is called polymorphism. -- Object-Oriented Programming with Objective-C, Apple

    Polymorphism allows you to write code targeting superclass objects, use that code on subclass objects, and achieve possibly different results based on the actual class of the object.

    Assume classes Cat and Dog are both subclasses of the Animal class. You can write code targeting Animal objects and use that code on Cat and Dog objects, achieving possibly different results based on whether it is a Cat object or a Dog object. Some examples:

    • Declare an array of type Animal and still be able to store Dog and Cat objects in it.
    • Define a method that takes an Animal object as a parameter and yet be able to pass Dog and Cat objects to it.
    • Call a method on a Dog or a Cat object as if it is an Animal object (i.e., without knowing whether it is a Dog object or a Cat object) and get a different response from it based on its actual class e.g., call the Animal class' method speak() on object a and get a "Meow" as the return value if a is a Cat object and "Woof" if it is a Dog object.

    Polymorphism literally means "ability to take many forms".

    W4.1b Paradigms → OOP → Inheritance → Overriding

    Can explain method overriding

    Method overriding is when a sub-class changes the behavior inherited from the parent class by re-implementing the method. Overridden methods have the same name, same type signature, and same return type.

    Consider the following case of EvaluationReport class inheriting the Report class:

    Report methods EvaluationReport methods Overrides?
    print() print() Yes
    write(String) write(String) Yes
    read():String read(int):String No. Reason: the two methods have different signatures; This is a case of overloading (rather than overriding).

    Paradigms → OOP → Inheritance →

    Overloading

    Method overloading is when there are multiple methods with the same name but different type signatures. Overloading is used to indicate that multiple operations do similar things but take different parameters.

    Type Signature: The type signature of an operation is the type sequence of the parameters. The return type and parameter names are not part of the type signature. However, the parameter order is significant.

    Example:

    Method Type Signature
    int add(int X, int Y) (int, int)
    void add(int A, int B) (int, int)
    void m(int X, double Y) (int, double)
    void m(double X, int Y) (double, int)

    In the case below, the calculate method is overloaded because the two methods have the same name but different type signatures (String) and (int)

    • calculate(String): void
    • calculate(int): void

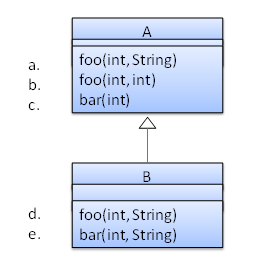
    Which of these methods override another method? A is the parent class. B inherits A.

    • a
    • b
    • c
    • d
    • e

    d

    Explanation: Method overriding requires a method in a child class to use the same method name and same parameter sequence used by one of its ancestors

    W4.1c C++ to Java → Inheritance → Polymorphism

    Can use polymorphism in Java

    Java is a strongly-typed language which means the code works with only the object types that it targets.

    The following code PetShelter keeps a list of Cat objects and make them speak. The code will not work with any other type, for example, Dog objects.

    public class PetShelter {
        private static Cat[] cats = new Cat[]{
                new Cat("Mittens"),
                new Cat("Snowball")};
    
        public static void main(String[] args) {
            for (Cat c: cats){
                System.out.println(c.speak());
            }
        }
    }
    

    Mittens: Meow
    Snowball: Meow
    
    public class Cat {
        public Cat(String name) {
            super(name);
        }
    
        public String speak() {
            return name + ": Meow";
        }
    }
    

    This strong-typing can lead to unnecessary verbosity caused by repetitive similar code that do similar things with different object types.

    If the PetShelter is to keep both cats and dogs, you'll need two arrays and two loops:

    public class PetShelter {
        private static Cat[] cats = new Cat[]{
                new Cat("Mittens"),
                new Cat("Snowball")};
        private static Dog[] dogs = new Dog[]{
                new Dog("Spot")};
    
        public static void main(String[] args) {
            for (Cat c: cats){
                System.out.println(c.speak());
            }
            for(Dog d: dogs){
                System.out.println(d.speak());
            }
        }
    }
    

    Mittens: Meow
    Snowball: Meow
    Spot: Woof
    
    public class Dog {
        public Dog(String name) {
            super(name);
        }
    
        public String speak() {
            return name + ": Woof";
        }
    }
    

    A better way is to take advantage of polymorphism to write code that targets a superclass so that it works with any subclass objects.

    The PetShelter2 use one data structure to keep both types of animals and one loop to make them speak. The code targets the Animal superclass (assuming Cat and Dog inherits from the Animal class) instead of repeating the code for each animal type.

    public class PetShelter2 {
        private static Animal[] animals = new Animal[]{
                new Cat("Mittens"),
                new Cat("Snowball"),
                new Dog("Spot")};
    
        public static void main(String[] args) {
            for (Animal a: animals){
                System.out.println(a.speak());
            }
        }
    }
    

    Mittens: Meow
    Snowball: Meow
    Spot: Woof
    
    public class Animal {
    
        protected String name;
    
        public Animal(String name){
            this.name = name;
        }
        public String speak(){
            return name;
        }
    }
    
    public class Cat extends Animal {
        public Cat(String name) {
            super(name);
        }
    
        @Override
        public String speak() {
            return name + ": Meow";
        }
    }
    
    public class Dog extends Animal {
        public Dog(String name) {
            super(name);
        }
    
        @Override
        public String speak() {
            return name + ": Woof";
        }
    }
    

    Explanation: Because Java supports polymorphism, you can store both Cat and Dog objects in an array of Animal objects. Similarly, you can call the speak method on any Animal object (as done in the loop) and yet get different behavior from Cat objects and Dog objects.

    Suggestion: try to add an Animal object (e.g., new Animal("Unnamed")) to the animals array and see what happens.

    Polymorphic code is better in several ways:

    • It is shorter.
    • It is simpler.
    • It is more flexible (in the above example, the main method will work even if we add more animal types).

    The Main class below keeps a list of Circle and Rectangle objects and prints the area (as an int value) of each shape when requested.

    Add the missing variables/methods to the code below so that it produces the output given.

    public class Main {
        //TODO add your methods here
    
        public static void main(String[] args) {
            addShape(new Circle(5));
            addShape(new Rectangle(3, 4));
            addShape(new Circle(10));
            printAreas();
            addShape(new Rectangle(4, 4));
            printAreas();
        }
    }
    

    78
    12
    314
    78
    12
    314
    16
    

    Circle class and Rectangle class is given below but you'll need to add a parent class Shape:

    public class Circle {
    
        private int radius;
    
        public Circle(int radius) {
            this.radius = radius;
        }
    
        public int area() {
            return (int)(Math.PI * radius * radius);
        }
    }
    
    public class Rectangle {
        private int height;
        private int width;
    
        public Rectangle(int height, int width){
            this.height = height;
            this.width = width;
        }
    
        public int area() {
            return height * width;
        }
    }
    

    You may use an array of size 100 to store the shapes.

    public class Main {
        private static Shape[] shapes = new Shape[100];
        private static int shapeCount = 0;
    
        public static void addShape(Shape s){
            shapes[shapeCount] = s;
            shapeCount++;
        }
    
        // ...
    
    }
    

    Abstract Classes

    W4.1d Paradigms → OOP → Inheritance → Abstract Classes and Methods

    Can implement abstract classes

    Abstract Class: A class declared as an abstract class cannot be instantiated, but it can be subclassed.

    You can declare a class as abstract when a class is merely a representation of commonalities among its subclasses in which case it does not make sense to instantiate objects of that class.

    The Animal class that exist as a generalization of its subclasses Cat, Dog, Horse, Tiger etc. can be declared as abstract because it does not make sense to instantiate an Animal object.

    Abstract Method: An abstract method is a method signature without a method implementation.

    The move method of the Animal class is likely to be an abstract method as it is not possible to implement a move method at the Animal class level to fit all subclasses because each animal type can move in a different way.

    A class that has an abstract method becomes an abstract class because the class definition is incomplete (due to the missing method body) and it is not possible to create objects using an incomplete class definition.

    W4.1e Tools → UML → Class Diagrams → Abstract Classes → What

    Can interpret abstract classes in class diagrams

    You can use italics or {abstract} (preferred) keyword to denote abstract classes/methods.

    Example:

    W4.1f C++ to Java → Inheritance → Abstract Classes and Methods

    Can use abstract classes and methods

    In Java, an abstract method is declared with the keyword abstract and given without an implementation. If a class includes abstract methods, then the class itself must be declared abstract.

    The speak method in this Animal class is abstract. Note how the method signature ends with a semicolon and there is no method body. This makes sense as the implementation of the speak method depends on the type of the animal and it is meaningless to provide a common implementation for all animal types.

    public abstract class Animal {
    
        protected String name;
    
        public Animal(String name){
            this.name = name;
        }
        public abstract String speak();
    }
    

    As one method of the class is abstract, the class itself is abstract.

    An abstract class is declared with the keyword abstract. Abstract classes can be used as reference type but cannot be instantiated.

    This Account class has been declared as abstract although it does not have any abstract methods. Attempting to instantiate Account objects will result in a compile error.

    public abstract class Account {
    
        int number;
    
        void close(){
            //...
        }
    }
    

    Account a; OK to use as a type
    a = new Account(); Compile error!

    In Java, even a class that does not have any abstract methods can be declared as an abstract class.

    When an abstract class is subclassed, the subclass should provides implementations for all of the abstract methods in its superclass or else the subclass must also be declared abstract.

    The Feline class below inherits from the abstract class Animal but it does not provide an implementation for the abstract method speak. As a result, the Feline class needs to be abstract too.

    public abstract class Feline extends Animal {
        public Feline(String name) {
            super(name);
        }
    
    }
    

    The DomesticCat class inherits the abstract Feline class and provides the implementation for the abstract method speak. As a result, it need not be (but can be) declared as abstract.

    public class DomesticCat extends Feline {
        public DomesticCat(String name) {
            super(name);
        }
    
        @Override
        public String speak() {
            return "Meow";
        }
    }
    
    • Animal a = new Feline("Mittens");
      Compile error! Feline is abstract.
    • Animal a = new DomesticCat("Mittens");
      OK. DomesticCat can be instantiated and assigned to a variable of Animal type (the assignment is allowed by polymorphism).

    The Main class below keeps a list of Circle and Rectangle objects and prints the area (as an int value) of each shape when requested.

    public class Main {
        private static Shape[] shapes = new Shape[100];
        private static int shapeCount = 0;
    
        public static void addShape(Shape s){
            shapes[shapeCount] = s;
            shapeCount++;
        }
    
        public static void printAreas(){
            for (int i = 0; i < shapeCount; i++){
                shapes[i].print();
            }
        }
    
        public static void main(String[] args) {
            addShape(new Circle(5));
            addShape(new Rectangle(3, 4));
            addShape(new Circle(10));
            addShape(new Rectangle(4, 4));
            printAreas();
        }
    }
    

    Circle of area 78
    Rectangle of area 12
    Circle of area 314
    Rectangle of area 16
    

    Circle class and Rectangle class is given below:

    public class Circle extends Shape {
    
        private int radius;
    
        public Circle(int radius) {
            this.radius = radius;
        }
    
        @Override
        public int area() {
            return (int)(Math.PI * radius * radius);
        }
    
        @Override
        public void print() {
            System.out.println("Circle of area " + area());
        }
    }
    
    public class Rectangle extends Shape {
        private int height;
        private int width;
    
        public Rectangle(int height, int width){
            this.height = height;
            this.width = width;
        }
    
        @Override
        public int area() {
            return height * width;
        }
    
        @Override
        public void print() {
            System.out.println("Rectangle of area " + area());
        }
    }
    

    Add the missing Shape class as an abstract class with two abstract methods.

    public abstract class Shape {
    
        public abstract int area();
        // ...
    }
    

    Choose the correct statements about Java abstract classes and concrete classes.

    • a. A concrete class can contain an abstract method.
    • b. An abstract class can contain concrete methods.
    • c. An abstract class need not contain any concrete methods.
    • d. An abstract class cannot be instantiated.

    (b)(c)(d)

    Explanation: A concrete class cannot contain even a single abstract method.


    Interfaces

    W4.1g Paradigms → OOP → Inheritance → Interfaces

    Can explain interfaces

    An interface is a behavior specification i.e. a collection of method specifications. If a class implements the interface, it means the class is able to support the behaviors specified by the said interface.

    There are a number of situations in software engineering when it is important for disparate groups of programmers to agree to a "contract" that spells out how their software interacts. Each group should be able to write their code without any knowledge of how the other group's code is written. Generally speaking, interfaces are such contracts. --Oracle Docs on Java

    Suppose SalariedStaff is an interface that contains two methods setSalary(int) and getSalary(). AcademicStaff can declare itself as implementing the SalariedStaff interface, which means the AcademicStaff class must implement all the methods specified by the SalariedStaff interface i.e., setSalary(int) and getSalary().

    A class implementing an interface results in an is-a relationship, just like in class inheritance.

    In the example above, AcademicStaff is a SalariedStaff. An AcademicStaff object can be used anywhere a SalariedStaff object is expected e.g. SalariedStaff ss = new AcademicStaff().

    W4.1h Tools → UML → Class Diagrams → Interfaces → Interfaces

    Can interpret interfaces in class diagrams

    An interface is shown similar to a class with an additional keyword << interface >>. When a class implements an interface, it is shown similar to class inheritance except a dashed line is used instead of a solid line.

    The AcademicStaff and the AdminStaff classes implement the SalariedStaff interface.

    W4.1i C++ to Java → Inheritance → Interfaces

    Can use interfaces in Java

    The text given in this section borrows some explanations and code examples from the -- Java Tutorial.

    In Java, an interface is a reference type, similar to a class, mainly containing method signatures. Defining an interface is similar to creating a new class except it uses the keyword interface in place of class.

    Here is an interface named DrivableVehicle that defines methods needed to drive a vehicle.

    public interface DrivableVehicle {
        void turn(Direction direction);
        void changeLanes(Direction direction);
        void signalTurn(Direction direction, boolean signalOn);
        // more method signatures
    }
    

    Note that the method signatures have no braces ({ }) and are terminated with a semicolon.

    Interfaces cannot be instantiated—they can only be implemented by classes. When an instantiable class implements an interface, indicated by the keyword implements, it provides a method body for each of the methods declared in the interface.

    Here is how a class CarModelX can implement the DrivableVehicle interface.

    public class CarModelX implements DrivableVehicle {
    
        @Override
        public void turn(Direction direction) {
           // implementation
        }
    
        // implementation of other methods
    }
    

    An interface can be used as a type e.g., DrivableVechile dv = new CarModelX();.

    Interfaces can inherit from other interfaces using the extends keyword, similar to a class inheriting another.

    Here is an interface named SelfDrivableVehicle that inherits the DrivableVehicle interface.

    public interface SelfDrivableVehicle extends DrivableVehicle {
       void goToAutoPilotMode();
    }
    

    Note that the method signatures have no braces and are terminated with a semicolon.

    Furthermore, Java allows multiple inheritance among interfaces. A Java interface can inherit multiple other interfaces. A Java class can implement multiple interfaces (and inherit from one class).

    The design below is allowed by Java. In case you are not familiar with UML notation used: solid lines indicate normal inheritance; dashed lines indicate interface inheritance; the triangle points to the parent.

    1. Staff interface inherits (note the solid lines) the interfaces TaxPayer and Citizen.
    2. TA class implements both Student interface and the Staff interface.
    3. Because of point 1 above, TA class has to implement all methods in the interfaces TaxPayer and Citizen.
    4. Because of points 1,2,3, a TA is a Staff, is a TaxPayer and is a Citizen.

    Interfaces can also contain constants and static methods.

    C++ to Java → Miscellaneous Topics →

    Constants

    Java does not directly support constants. The convention is to use a static final variable where a constant is needed. The static modifier causes the variable to be available without instantiating an object. The final modifier causes the variable to be unchangeable. Java constants are normally declared in ALL CAPS separated by underscores.

    Here is an example of a constant named MAX_BALANCE which can be accessed as Account.MAX_BALANCE.

    public class Account{
    
      public static final double MAX_BALANCE = 1000000.0;
    
    }
    

    Math.PI is an example constant that comes with Java.

    This example adds a constant MAX_SPEED and a static method isSpeedAllowed to the interface DrivableVehicle.

    public interface DrivableVehicle {
    
        int MAX_SPEED = 150;
    
        static boolean isSpeedAllowed(int speed){
            return speed <= MAX_SPEED;
        }
    
        void turn(Direction direction);
        void changeLanes(Direction direction);
        void signalTurn(Direction direction, boolean signalOn);
        // more method signatures
    }
    

    Interfaces can contain default method implementations and nested types. They are not covered here.

    The Main class below passes a list of Printable objects (i.e., objects that implement the Printable interface) for another method to be printed.

    public class Main {
    
        public static void printObjects(Printable[] items) {
            for (Printable p : items) {
                p.print();
            }
        }
    
        public static void main(String[] args) {
            Printable[] printableItems = new Printable[]{
                    new Circle(5),
                    new Rectangle(3, 4),
                    new Person("James Cook")};
    
            printObjects(printableItems);
        }
    }
    

    Circle of area 78
    Rectangle of area 12
    Person of name James Cook
    

    Classes Shape, Circle, and Rectangle are given below:

    public abstract class Shape {
    
        public abstract int area();
    }
    
    public class Circle extends Shape implements Printable {
    
        private int radius;
    
        public Circle(int radius) {
            this.radius = radius;
        }
    
        @Override
        public int area() {
            return (int)(Math.PI * radius * radius);
        }
    
        @Override
        public void print() {
            System.out.println("Circle of area " + area());
        }
    }
    
    public class Rectangle extends Shape implements Printable {
        private int height;
        private int width;
    
        public Rectangle(int height, int width){
            this.height = height;
            this.width = width;
        }
    
        @Override
        public int area() {
            return height * width;
        }
    
        @Override
        public void print() {
            System.out.println("Rectangle of area " + area());
        }
    }
    

    Add the missing Printable interface. Add the missing methods of the Person class given below.

    public class Person implements Printable {
    
        private String name;
    
        // todo: add missing methods
    }
    
    public interface Printable {
        //...
    }
    

    [W4.2] Generics in Java

    W4.2a C++ to Java → Generics → What are Generics?

    Can explain Java Generics

    Given below is an extract from the -- Java Tutorial, with some adaptations.

    You can use polymorphism to write code that can work with multiple types, but that approach has some shortcomings.

    Consider the following Box class. It can be used only for storing Integer objects.

    public class BoxForIntegers {
        private Integer x;
    
        public void set(Integer x) {
            this.x = x;
        }
        public Integer get() {
            return x;
        }
    }
    

    To store String objects, another similar class is needed, resulting in the duplication of the entire class. As you can see, if you need to store many different types of objects, you could end up writing many similar classes.

    public class BoxForString {
        private String x;
    
        public void set(String x) {
            this.x = x;
        }
        public String get() {
            return x;
        }
    }
    

    One solution for this problem is to use polymorphism i.e., write the Box class to store Object objects.

    public class Box {
        private Object x;
    
        public void set(Object x) {
            this.x = x;
        }
        public Object get() {
            return x;
        }
    }
    

    The problem with this solution is, since its methods accept or return an Object, you are free to pass in whatever you want, provided that it is not one of the primitive types. There is no way to verify, at compile time, how the class is used. One part of the code may place an Integer in the box and expect to get Integers out of it, while another part of the code may mistakenly pass in a String, resulting in a runtime error.

    Generics enable types (classes and interfaces) to be parameters when defining classes, interfaces and methods. Much like the more familiar formal parameters used in method declarations, type parameters provide a way for you to re-use the same code with different inputs. The difference is that the inputs to formal parameters are values, while the inputs to type parameters are types.

    A generic Box class allows you to define what type of elements will be put in the Box. For example, you can instantiate a Box object to keep Integer elements so that any attempt to put a non-Integer object in that Box object will result in a compile error.

    W4.2b C++ to Java → Generics → How to use Generics

    Can use Java Generics

    This section includes extract from the -- Java Tutorial, with some adaptations.

    The definition of a generic class includes a type parameter section, delimited by angle brackets (<>). It specifies the type parameters (also called type variables) T1, T2, ..., and Tn. A generic class is defined with the following format:

    class name<T1, T2, ..., Tn> { /* ... */ }
    

    Here is a generic Box class. The class declaration Box<T> introduces the type variable, T, which is also used inside the class to refer to the same type.

    Using Object as the type:

    public class Box {
        private Object x;
    
        public void set(Object x) {
            this.x = x;
        }
    
        public Object get() {
            return x;
        }
    }
    

    A generic Box using type parameter T:

    public class Box<T> {
        private T x;
    
        public void set(T x) {
            this.x = x;
        }
    
        public T get() {
            return x;
        }
    }
    

    As you can see, all occurrences of Object are replaced by T.

    To reference the generic Box class from within your code, you must perform a generic type invocation, which replaces T with some concrete value, such as Integer. It is similar to an ordinary method invocation, but instead of passing an argument to a method, you are passing a type argument enclosed within angle brackets — e.g., <Integer> or <String, Integer> — to the generic class itself. Note that in some cases you can omit the type parameter i.e., <> if the type parameter can be inferred from the context.

    Using the generic Box class to store Integer objects:

    Box<Integer> integerBox;
    integerBox = new Box<>(); // type parameter omitted as it can be inferred
    integerBox.set(Integer.valueOf(4));
    Integer i = integerBox.get(); // returns an Integer
    
    • Box<Integer> integerBox; simply declares that integerBox will hold a reference to a "Box of Integer", which is how Box<Integer> is read.
    • integerBox = new Box<>(); instantiates a Box<Integer> class. Note the <> (an empty pair of angle brackets, also called the diamond operator) between the class name and the parenthesis.

    The compiler is able to check for type errors when using generic code.

    The code below will fail because it creates a Box<String> and then tries to pass Double objects into it.

    Box<String> stringBox = new Box<>();
    stringBox.set(Double.valueOf(5.0)); //compile error!
    

    A generic class can have multiple type parameters.

    The generic OrderedPair class, which implements the generic Pair interface:

    public interface Pair<K, V> {
        public K getKey();
        public V getValue();
    }
    
    public class OrderedPair<K, V> implements Pair<K, V> {
    
        private K key;
        private V value;
    
        public OrderedPair(K key, V value) {
            this.key = key;
            this.value = value;
        }
    
        public K getKey()	{ return key; }
        public V getValue() { return value; }
    }
    

    The following statements create two instantiations of the OrderedPair class:

    Pair<String, Integer> p1 = new OrderedPair<>("Even", 8);
    Pair<String, String>  p2 = new OrderedPair<>("hello", "world");
    

    The code, new OrderedPair<String, Integer>, instantiates K as a String and V as an Integer. Therefore, the parameter types of OrderedPair's constructor are String and Integer, respectively.

    A type variable can be any non-primitive type you specify: any class type, any interface type, any array type, or even another type variable.

    By convention, type parameter names are single, uppercase letters. The most commonly used type parameter names are:

    • E - Element (used extensively by the Java Collections Framework)
    • K - Key
    • N - Number
    • T - Type
    • V - Value
    • S, U, V etc. - 2nd, 3rd, 4th types
    [W4.3] Java Collections

    W4.3a C++ to Java → Collections → The Collections Framework

    Can explain the Collections framework

    This section uses extracts from the -- Java Tutorial, with some adaptations.

    A collection — sometimes called a container — is simply an object that groups multiple elements into a single unit. Collections are used to store, retrieve, manipulate, and communicate aggregate data.

    Typically, collections represent data items that form a natural group, such as a poker hand (a collection of cards), a mail folder (a collection of letters), or a telephone directory (a mapping of names to phone numbers).

    The collections framework is a unified architecture for representing and manipulating collections. It contains the following:

    • Interfaces: These are abstract data types that represent collections. Interfaces allow collections to be manipulated independently of the details of their representation.
      Example: the List<E> interface can be used to manipulate list-like collections which may be implemented in different ways such as ArrayList<E> or LinkedList<E>.

    • Implementations: These are the concrete implementations of the collection interfaces. In essence, they are reusable data structures.
      Example: the ArrayList<E> class implements the List<E> interface while the HashMap<K, V> class implements the Map<K, V> interface.

    • Algorithms: These are the methods that perform useful computations, such as searching and sorting, on objects that implement collection interfaces. The algorithms are said to be polymorphic: that is, the same method can be used on many different implementations of the appropriate collection interface.
      Example: the sort(List<E>) method can sort a collection that implements the List<E> interface.

    A well-known example of collections frameworks is the C++ Standard Template Library (STL). Although both are collections frameworks and the syntax look similar, note that there are important philosophical and implementation differences between the two.

    The following list describes the core collection interfaces:

    • Collection — the root of the collection hierarchy. A collection represents a group of objects known as its elements. The Collection interface is the least common denominator that all collections implement and is used to pass collections around and to manipulate them when maximum generality is desired. Some types of collections allow duplicate elements, and others do not. Some are ordered and others are unordered. The Java platform doesn't provide any direct implementations of this interface but provides implementations of more specific subinterfaces, such as Set and List. Also see the Collection API.

    • Set — a collection that cannot contain duplicate elements. This interface models the mathematical set abstraction and is used to represent sets, such as the cards comprising a poker hand, the courses making up a student's schedule, or the processes running on a machine. Also see the Set API.

    • List — an ordered collection (sometimes called a sequence). Lists can contain duplicate elements. The user of a List generally has precise control over where in the list each element is inserted and can access elements by their integer index (position). Also see the List API.

    • Queue — a collection used to hold multiple elements prior to processing. Besides basic Collection operations, a Queue provides additional insertion, extraction, and inspection operations. Also see the Queue API.

    • Map — an object that maps keys to values. A Map cannot contain duplicate keys; each key can map to at most one value. Also see the Map API.

    • Others: Deque, SortedSet, SortedMap

    W4.3b C++ to Java → Collections → The ArrayList Class

    Can use the ArrayList class

    The ArrayList class is a resizable-array implementation of the List interface. Unlike a normal array, an ArrayList can grow in size as you add more items to it. The example below illustrate some of the useful methods of the ArrayList class using an ArrayList of String objects.

    import java.util.ArrayList;
    
    public class ArrayListDemo {
    
        public static void main(String args[]) {
            ArrayList<String> items = new ArrayList<>();
    
            System.out.println("Before adding any items:" + items);
    
            items.add("Apple");
            items.add("Box");
            items.add("Cup");
            items.add("Dart");
            print("After adding four items: " + items);
    
            items.remove("Box"); // remove item "Box"
            print("After removing Box: " + items);
    
            items.add(1, "Banana"); // add "Banana" at index 1
            print("After adding Banana: " + items);
    
            items.add("Egg"); // add "Egg", will be added to the end
            items.add("Cup"); // add another "Cup"
            print("After adding Egg: " + items);
    
            print("Number of items: " + items.size());
    
            print("Index of Cup: " + items.indexOf("Cup"));
            print("Index of Zebra: " + items.indexOf("Zebra"));
    
            print("Item at index 3 is: " + items.get(2));
    
            print("Do we have a Box?: " + items.contains("Box"));
            print("Do we have an Apple?: " + items.contains("Apple"));
    
            items.clear();
            print("After clearing: " + items);
        }
    
        private static void print(String text) {
            System.out.println(text);
        }
    }
    

    Before adding any items:[]
    After adding four items: [Apple, Box, Cup, Dart]
    After removing Box: [Apple, Cup, Dart]
    After adding Banana: [Apple, Banana, Cup, Dart]
    After adding Egg: [Apple, Banana, Cup, Dart, Egg, Cup]
    Number of items: 6
    Index of Cup: 2
    Index of Zebra: -1
    Item at index 3 is: Cup
    Do we have a Box?: false
    Do we have an Apple?: true
    After clearing: []
    

    [Try the above code on Repl.it]

    Add the missing methods to the class given below so that it produces the output given.

    Use an ArrayList to store the numbers.

    public class Main {
    
        //TODO: add your methods here
    
        public static void main(String[] args) {
            System.out.println("Adding numbers to the list");
            addNumber(3);
            addNumber(8);
            addNumber(24);
            System.out.println("The total is: " + getTotal());
            System.out.println("8 in the list : " + isFound(8) );
            System.out.println("5 in the list : " + isFound(5) );
            removeNumber(8);
            System.out.println("The total is: " + getTotal());
        }
    
    }
    

    Adding numbers to the list
    [3]
    [3, 8]
    [3, 8, 24]
    The total is: 35
    8 in the list : true
    5 in the list : false
    [3, 24]
    The total is: 27
    

    Partial solution:

    import java.util.ArrayList;
    
    public class Main {
        private static ArrayList<Integer> numbers = new ArrayList<>();
    
        private static void addNumber(int i) {
            numbers.add(Integer.valueOf(i));
            System.out.println(numbers);
        }
    
        // ...
    
    }
    

    W4.3c C++ to Java → Collections → The HashMap Class

    Can use the HashMap class

    HashMap is an implementation of the Map interface. It allows you to store a collection of key-value pairs. The example below illustrates how to use a HashMap<String, Point> to maintain a list of coordinates and their identifiers e.g., the identifier x1 is used to identify the point 0,0 where x1 is the key and 0,0 is the value.

    import java.awt.Point;
    import java.util.HashMap;
    import java.util.Map;
    
    public class HashMapDemo {
        public static void main(String[] args) {
            HashMap<String, Point> points = new HashMap<>();
    
            // put the key-value pairs in the HashMap
            points.put("x1", new Point(0, 0));
            points.put("x2", new Point(0, 5));
            points.put("x3", new Point(5, 5));
            points.put("x4", new Point(5, 0));
    
            // retrieve a value for a key using the get method
            print("Coordinates of x1: " + pointAsString(points.get("x1")));
    
            // check if a key or a value exists
            print("Key x1 exists? " + points.containsKey("x1"));
            print("Key x1 exists? " + points.containsKey("y1"));
            print("Value (0,0) exists? " + points.containsValue(new Point(0, 0)));
            print("Value (1,2) exists? " + points.containsValue(new Point(1, 2)));
    
            // update the value of a key to a new value
            points.put("x1", new Point(-1,-1));
    
            // iterate over the entries
            for (Map.Entry<String, Point> entry : points.entrySet()) {
                print(entry.getKey() + " = " + pointAsString(entry.getValue()));
            }
    
            print("Number of keys: " + points.size());
            points.clear();
            print("Number of keys after clearing: " + points.size());
    
        }
    
        public static String pointAsString(Point p) {
            return "[" + p.x + "," + p.y + "]";
        }
    
        public static void print(String s) {
            System.out.println(s);
        }
    }
    

    Coordinates of x1: [0,0]
    Key x1 exists? true
    Key x1 exists? false
    Value (0,0) exists? true
    Value (1,2) exists? false
    x1 = [-1,-1]
    x2 = [0,5]
    x3 = [5,5]
    x4 = [5,0]
    Number of keys: 4
    Number of keys after clearing: 0
    

    [Try the above code on Repl.it]

    The class given below keeps track of how many people signup to attend an event on each day of the week. Add the missing methods so that it produces the output given.

    Use an HashMap to store the number of entries for each day.

    public class Main {
        private static HashMap<String, Integer> roster = new HashMap<>();
    
        //TODO: add your methods here
    
        public static void main(String[] args) {
            addToRoster("Monday"); // i.e., one person signed up for Monday
            addToRoster("Wednesday"); // i.e., one person signed up for Wednesday
            addToRoster("Wednesday"); // i.e., another person signed up for Wednesday
            addToRoster("Friday");
            addToRoster("Monday");
            printRoster();
        }
    
    }
    

    Monday => 2
    Friday => 1
    Wednesday => 2
    

    Partial solution:

    import java.util.HashMap;
    import java.util.Map;
    
    public class Main {
        private static HashMap<String, Integer> roster = new HashMap<>();
    
        private static void addToRoster(String day) {
            if (roster.containsKey(day)){
                Integer newValue = Integer.valueOf(roster.get(day).intValue() + 1);
                roster.put(day, newValue);
            } else {
                roster.put(day, Integer.valueOf(1));
            }
        }
    
        // ...
    }
    

    [W4.4] RCS: Workflows


    Branching

    W4.4a Project Management → Revision Control → Branching

    Can explain branching

    Branching is the process of evolving multiple versions of the software in parallel. For example, one team member can create a new branch and add an experimental feature to it while the rest of the team keeps working on another branch. Branches can be given names e.g. master, release, dev.

    A branch can be merged into another branch. Merging usually result in a new commit that represents the changes done in the branch being merged.

    Branching and merging

    Merge conflicts happen when you try to merge two branches that had changed the same part of the code and the RCS software cannot decide which changes to keep. In those cases we have to ‘resolve’ those conflicts manually.

    In the context of RCS, what is the branching? What is the need for branching?.

    In the context of RCS, what is the merging branches? How can it lead to merge conflicts?.

    W4.4b Tools → Git and GitHub → Branch

    Can use Git branching

    0. Observe that you are normally in the branch called master. For this, you can take any repo you have on your computer (e.g. a clone of the samplerepo-things).

    git status
    

    on branch master
    

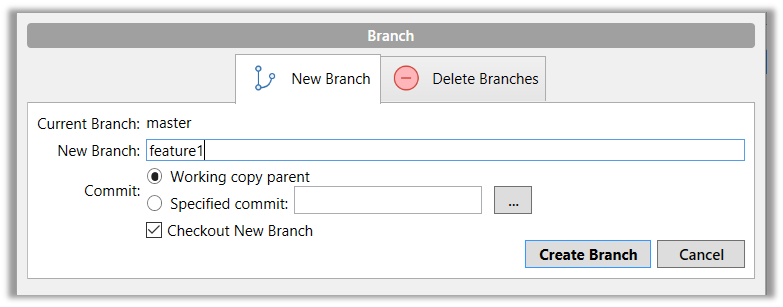
    1. Start a branch named feature1 and switch to the new branch.

    Click on the Branch button on the main menu. In the next dialog, enter the branch name and click Create Branch

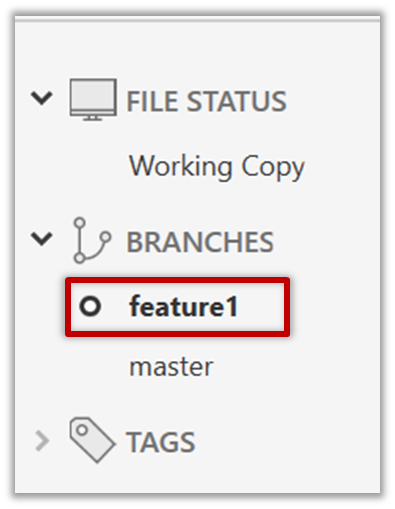
    Note how the feature1 is indicated as the current branch.

    You can use the branch command to create a new branch and the checkout command to switch to a specific branch.

    git branch feature1
    git checkout feature1
    

    One-step shortcut to create a branch and switch to it at the same time:

    git checkout –b feature1
    

    2. Create some commits in the new branch. Just commit as per normal. Commits you add while on a certain branch will become part of that branch.

    3. Switch to the master branch. Note how the changes you did in the feature1 branch are no longer in the working directory.

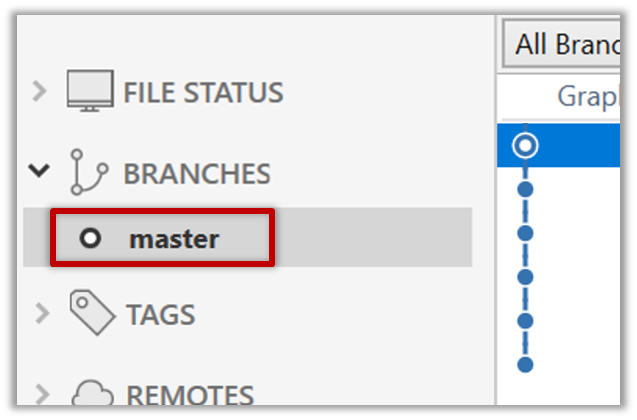
    Double-click the master branch

    git checkout master
    

    4. Add a commit to the master branch. Let’s imagine it’s a bug fix.

    5. Switch back to the feature1 branch (similar to step 3).

    6. Merge the master branch to the feature1 branch, giving an end-result like the below. Also note how Git has created a merge commit.

    Right-click on the master branch and choose merge master into the current branch. Click OK in the next dialog.

    git merge master
    

    Observe how the changes you did in the master branch (i.e. the imaginary bug fix) is now available even when you are in the feature1 branch.

    7. Add another commit to the feature1 branch.

    8. Switch to the master branch and add one more commit.

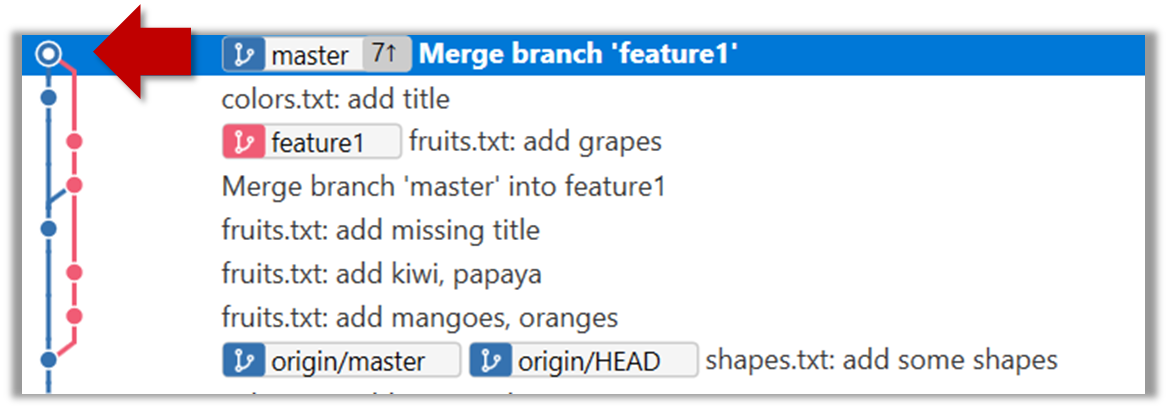
    9. Merge feature1 to the master branch, giving and end-result like this:

    Right-click on the feature1 branch and choose Merge....

    git merge feature1
    

    10. Create a new branch called add-countries, switch to it, and add some commits to it (similar to steps 1-2 above). You should have something like this now:

    11. Go back to the master branch and merge the add-countries branch onto the master branch (similar to steps 8-9 above). While you might expect to see something like the below,

    ... you are likely to see something like this instead:

    That is because Git does a fast forward merge if possible. Seeing that the master branch has not changed since you started the add-countries branch, Git has decided it is simpler to just put the commits of the add-countries branch in front of the master branch, without going into the trouble of creating an extra merge commit.

    It is possible to force Git to create a merge commit even if fast forwarding is possible.

    Tick the box shown below when you merge a branch:

    Use the --no-ff switch (short for no fast forward):

    git merge --no-ff add-countries
    

    Merge conflicts

    W4.4c Tools → Git and GitHub → Merge Conflicts

    Can use Git to resolve merge conflicts

    1. Start a branch named fix1 in a local repo. Create a commit that adds a line with some text to one of the files.

    2. Switch back to master branch. Create a commit with a conflicting change i.e. it adds a line with some different text in the exact location the previous line was added.

    3. Try to merge the fix1 branch onto the master branch. Git will pause mid-way during the merge and report a merge conflict. If you open the conflicted file, you will see something like this:

    COLORS
    ------
    blue
    <<<<<<< HEAD
    black
    =======
    green
    >>>>>>> fix1
    red
    white
    

    4. Observe how the conflicted part is marked between a line starting with <<<<<<< and a line starting with >>>>>>>, separated by another line starting with =======.

    This is the conflicting part that is coming from the master branch:

    
    <<<<<<< HEAD
    black
    =======


    This is the conflicting part that is coming from the fix1 branch:

    
    =======
    green
    >>>>>>> fix1


    5. Resolve the conflict by editing the file. Let us assume you want to keep both lines in the merged version. You can modify the file to be like this:

    COLORS
    ------
    blue
    black
    green
    red
    white
    

    6. Stage the changes, and commit.


    Pull requests

    W4.4d Tools → Git and GitHub → Create PRs

    Can create PRs on GitHub

    1. Fork the samplerepo-pr-practice onto your GitHub account. Clone it onto your computer.

    2. Create a branch named add-intro in your clone. Add a couple of commits which adds/modifies an Introduction section to the README.md. Example:

    
    # Introduction
    Creating Pull Requsts (PRs) is needed when using RCS in a multi-person projects.
    This repo can be used to practice creating PRs.


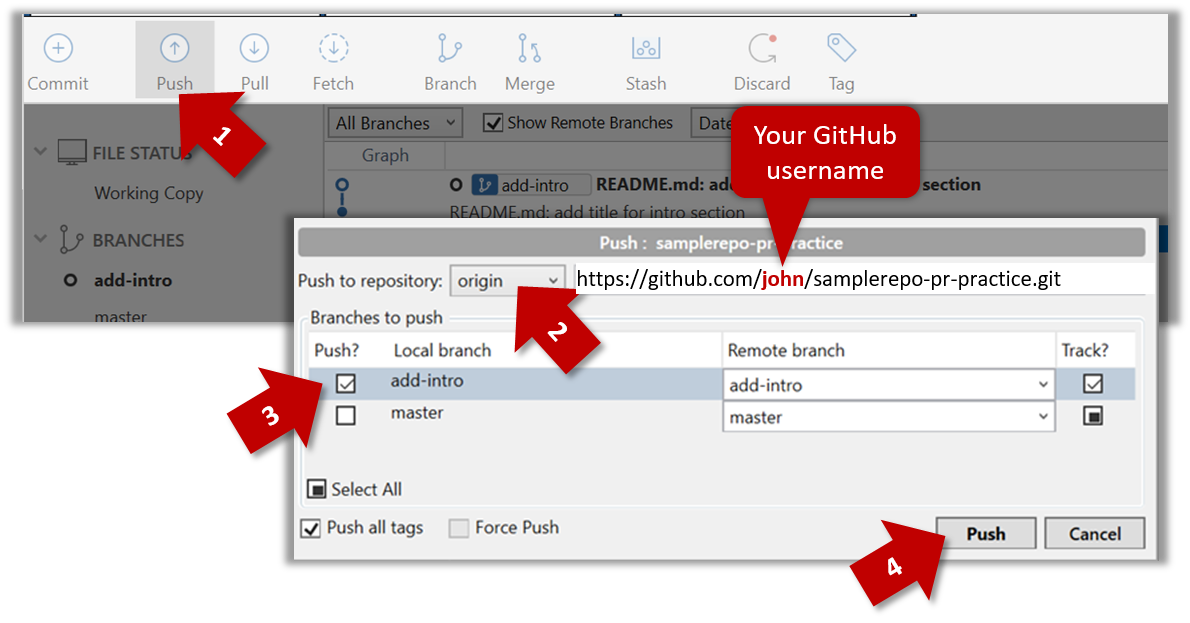
    3. Push the add-intro branch to your fork.

    git push origin add-intro
    

    4. Create a Pull Request from the add-intro branch in your fork to the master branch of the same fork (i.e. your-user-name/samplerepo-pr-practice, not se-edu/samplerepo-pr-practice), as described below.

    4a. Go to the GitHub page of your fork (i.e. https://github.com/{your_username}/samplerepo-pr-practice), click on the Pull Requests tab, and then click on New Pull Request button.

    4b. Select base fork and head fork as follows:

    • base fork: your own fork (i.e. {your user name}/samplerepo-pr-practice, NOT se-edu/samplerepo-pr-practice)
    • head fork: your own fork.

    The base fork is where changes should be applied. The head fork contains the changes you would like to be applied.

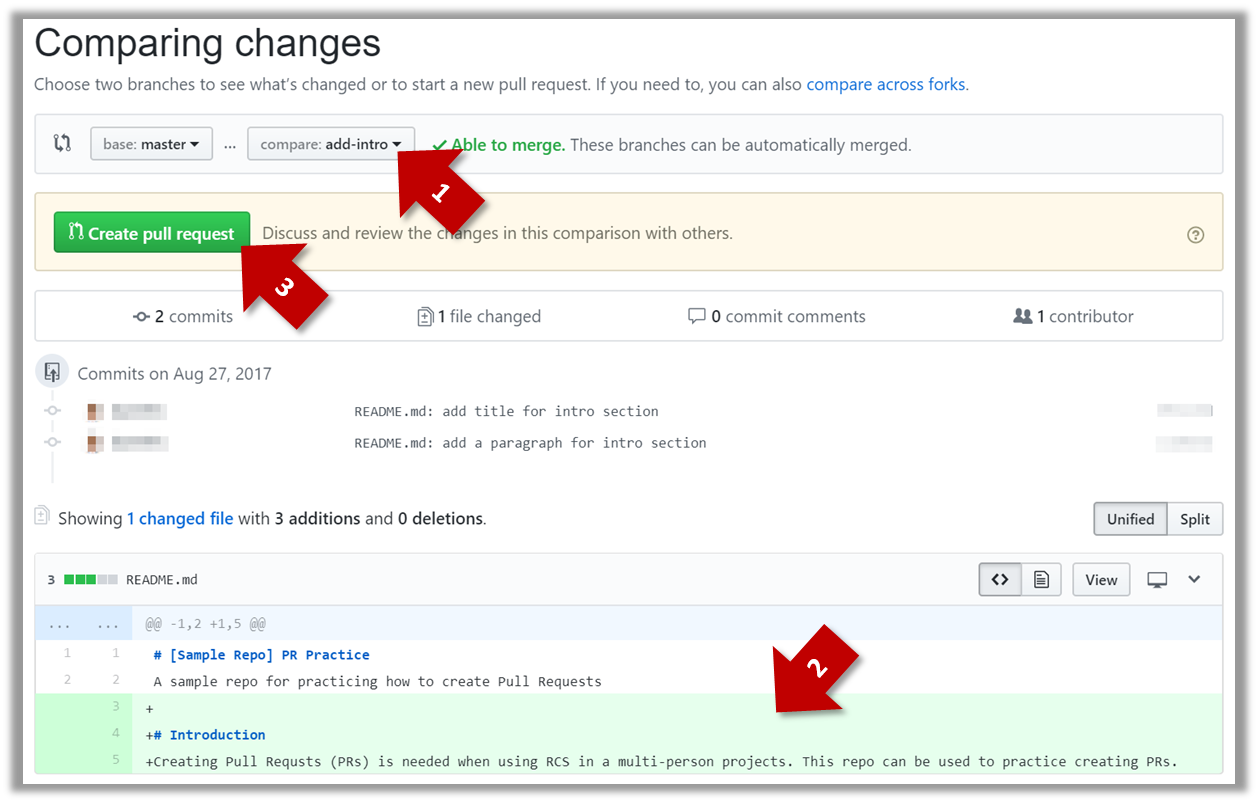
    4c. (1) Set the base branch to master and head branch to add-intro, (2) confirm the diff contains the changes you propose to merge in this PR (i.e. confirm that you did not accidentally include extra commits in the branch), and (3) click the Create pull request button.

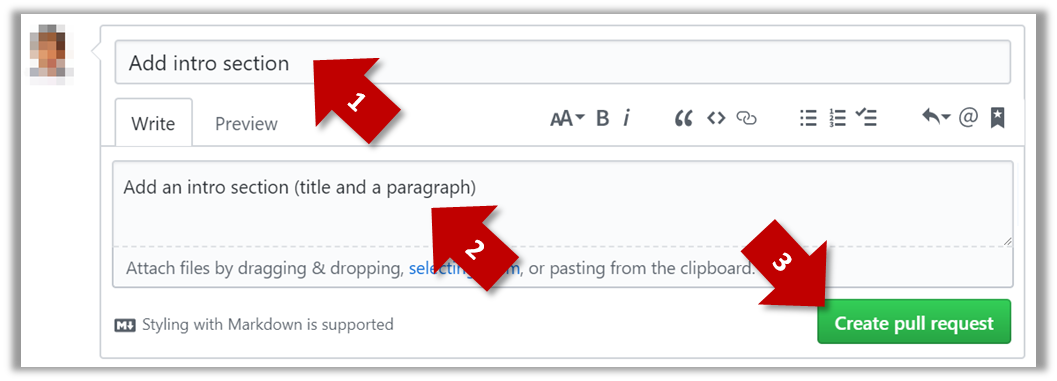
    4d. (1) Set PR name, (2) set PR description, and (3) Click the Create pull request button.

    A common newbie mistake when creating branch-based PRs is to mix commits of one PR with another. To learn how to avoid that mistake, you are encouraged to continue and create another PR as explained below.

    5. In your local repo, create a new branch add-summary off the master branch.

    When creating the new branch, it is very important that you switch back to the master branch first. If not, the new branch will be created off the current branch add-intro. And that is how you end up having commits of the first PR in the second PR as well.

    6. Add a commit in the add-summary branch that adds a Summary section to the README.md, in exactly the same place you added the Introduction section earlier.

    7. Push the add-summary to your fork and create a new PR similar to before.

    W4.4e Tools → Git and GitHub → Manage PRs

    Can review and merge PRs on GitHub

    1. Go to GitHub page of your fork and review the add-intro PR you created previously in [Tools → Git & GitHub → Create PRs] to simulate the PR being reviewed by another developer, as explained below. Note that some features available to PR reviewers will be unavailable to you because you are also the author of the PR.

    1. Fork the samplerepo-pr-practice onto your GitHub account. Clone it onto your computer.

    2. Create a branch named add-intro in your clone. Add a couple of commits which adds/modifies an Introduction section to the README.md. Example:

    
    # Introduction
    Creating Pull Requsts (PRs) is needed when using RCS in a multi-person projects.
    This repo can be used to practice creating PRs.


    3. Push the add-intro branch to your fork.

    git push origin add-intro
    

    4. Create a Pull Request from the add-intro branch in your fork to the master branch of the same fork (i.e. your-user-name/samplerepo-pr-practice, not se-edu/samplerepo-pr-practice), as described below.

    4a. Go to the GitHub page of your fork (i.e. https://github.com/{your_username}/samplerepo-pr-practice), click on the Pull Requests tab, and then click on New Pull Request button.

    4b. Select base fork and head fork as follows:

    • base fork: your own fork (i.e. {your user name}/samplerepo-pr-practice, NOT se-edu/samplerepo-pr-practice)
    • head fork: your own fork.

    The base fork is where changes should be applied. The head fork contains the changes you would like to be applied.

    4c. (1) Set the base branch to master and head branch to add-intro, (2) confirm the diff contains the changes you propose to merge in this PR (i.e. confirm that you did not accidentally include extra commits in the branch), and (3) click the Create pull request button.

    4d. (1) Set PR name, (2) set PR description, and (3) Click the Create pull request button.

    A common newbie mistake when creating branch-based PRs is to mix commits of one PR with another. To learn how to avoid that mistake, you are encouraged to continue and create another PR as explained below.

    5. In your local repo, create a new branch add-summary off the master branch.

    When creating the new branch, it is very important that you switch back to the master branch first. If not, the new branch will be created off the current branch add-intro. And that is how you end up having commits of the first PR in the second PR as well.

    6. Add a commit in the add-summary branch that adds a Summary section to the README.md, in exactly the same place you added the Introduction section earlier.

    7. Push the add-summary to your fork and create a new PR similar to before.

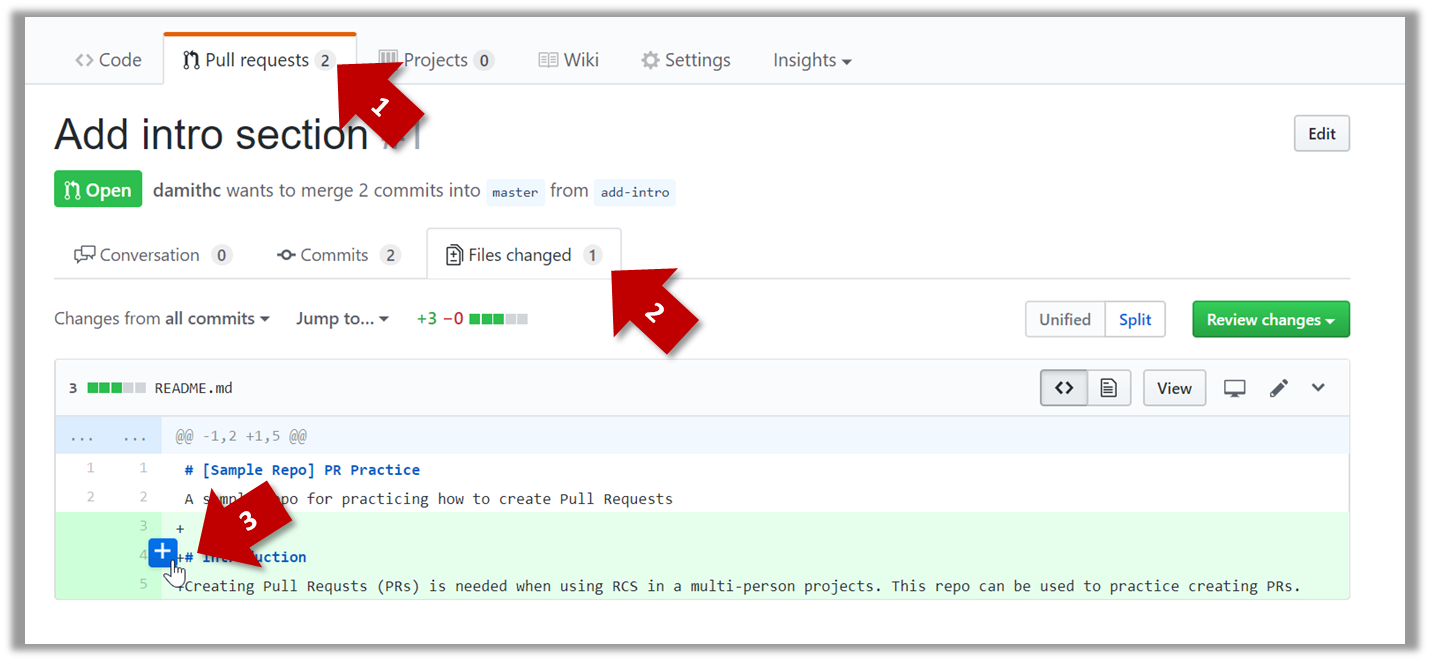
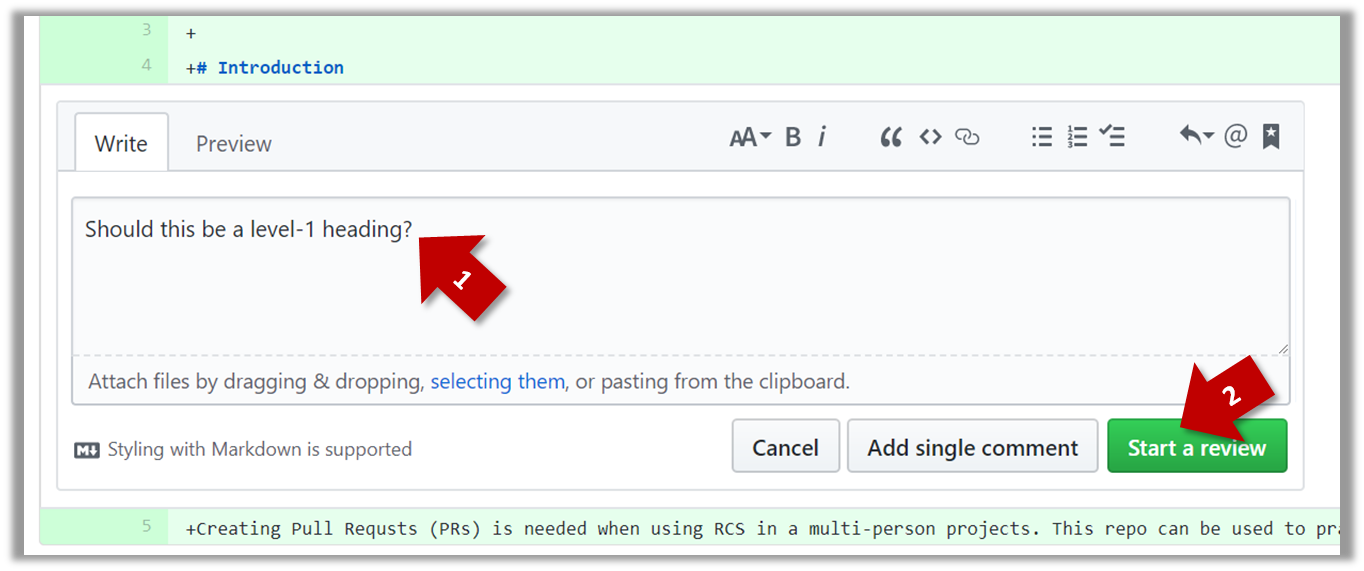
    1a. Go to the respective PR page and click on the Files changed tab. Hover over the line you want to comment on and click on the icon that appears on the left margin. That should create a text box for you to enter your comment.

    1b. Enter some dummy comment and click on Start a review button.

    1c. Add a few more comments in other places of the code.

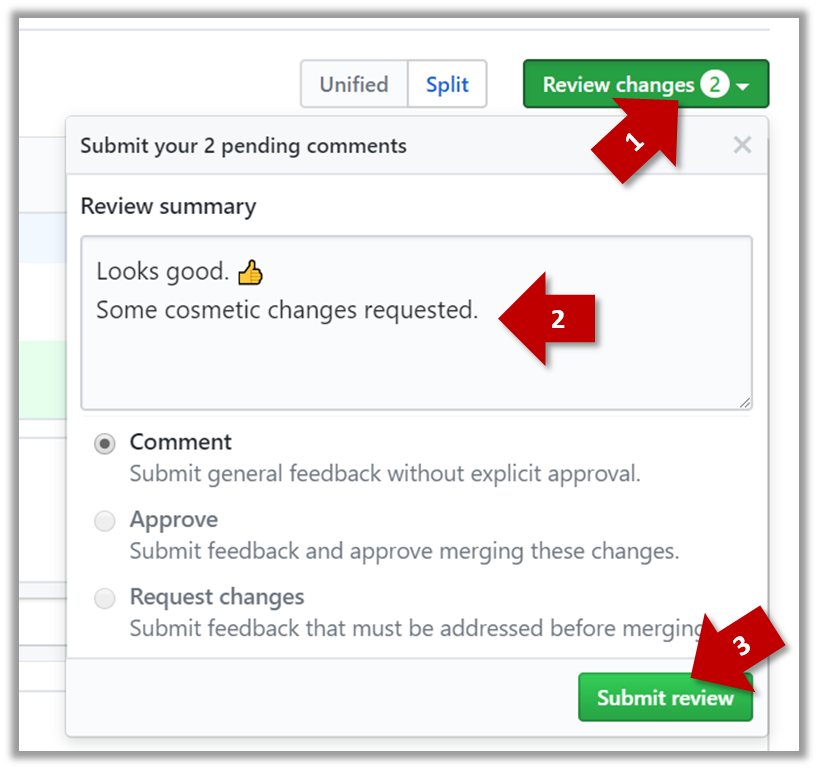
    1d. Click on the Review Changes button, enter an overall comment, and click on the Submit review button.

    2. Update the PR to simulate revising the code based on reviewer comments. Add some more commits to the add-intro branch and push the new commits to the fork. Observe how the PR is updated automatically to reflect the new code.

    3. Merge the PR. Go to the GitHub page of the respective PR, scroll to the bottom of the Conversation tab, and click on the Merge pull request button, followed by the Confirm merge button. You should see a Pull request successfully merged and closed message after the PR is merged.

    4. Sync the local repo with the remote repo. Because of the merge you did on the GitHub, the master branch of your fork is now ahead of your local repo by one commit. To sync the local repo with the remote repo, pull the master branch to the local repo.

    git checkout master
    git pull origin master
    

    Observe how the add-intro branch is now merged to the master branch in your local repo as well.

    5. De-conflict the add-summary PR that you created earlier. Note that GitHub page for the add-summary PR is now showing a conflict (when you scroll to the bottom of that page, you should see a message This branch has conflicts that must be resolved). You can resolve it locally and update the PR accordingly, as explained below.

    5a. Switch to the add-summary branch. To make that branch up-to-date with the master branch, merge the master branch to it, which will surface the merge conflict. Resolve it and complete the merge.

    5b. Push the updated add-summary branch to the fork. That will remove the 'merge conflicts' warning in the GitHub page of the PR.

    6. Merge the add-summary PR using the GitHub interface, similar to how you merged the previous PR.

    Note that you could have merged the add-summary branch to the master branch locally before pushing it to GitHub. In that case, the PR will be merged on GitHub automatically to reflect that the branch has been merged already.


    Workflows

    W4.4f Project Management → Revision Control → DRCS vs CRCS

    Can explain DRCS vs CRCS

    RCS can be done in two ways: the centralized way and the distributed way.

    Centralized RCS (CRCS for short)uses a central remote repo that is shared by the team. Team members download (‘pull’) and upload (‘push’) changes between their own local repositories and the central repository. Older RCS tools such as CVS and SVN support only this model. Note that these older RCS do not support the notion of a local repo either. Instead, they force users to do all the versioning with the remote repo.

    The centralized RCS approach without any local repos (e.g., CVS, SVN)

    Distributed RCS (DRCS for short, also known as Decentralized RCS) allows multiple remote repos and pulling and pushing can be done among them in arbitrary ways. The workflow can vary differently from team to team. For example, every team member can have his/her own remote repository in addition to their own local repository, as shown in the diagram below. Git and Mercurial are some prominent RCS tools that support the distributed approach.

    The decentralized RCS approach

    W4.4g Project Management → Revision Control → Forking Flow

    Can explain forking workflow

    In the forking workflow, the 'official' version of the software is kept in a remote repo designated as the 'main repo'. All team members fork the main repo create pull requests from their fork to the main repo.

    To illustrate how the workflow goes, let’s assume Jean wants to fix a bug in the code. Here are the steps:

    1. Jean creates a separate branch in her local repo and fixes the bug in that branch.
    2. Jean pushes the branch to her fork.
    3. Jean creates a pull request from that branch in her fork to the main repo.
    4. Other members review Jean’s pull request.
    5. If reviewers suggested any changes, Jean updates the PR accordingly.
    6. When reviewers are satisfied with the PR, one of the members (usually the team lead or a designated 'maintainer' of the main repo) merges the PR, which brings Jean’s code to the main repo.
    7. Other members, realizing there is new code in the upstream repo, sync their forks with the new upstream repo (i.e. the main repo). This is done by pulling the new code to their own local repo and pushing the updated code to their own fork.

    W4.4h Tools → Git and GitHub → Forking Workflow

    Can follow Forking Workflow

    This activity is best done as a team. If you are learning this alone, you can simulate a team by using two different browsers to log into GitHub using two different accounts.

    1. One member: set up the team org and the team repo.

    2. Each team member: create PRs via own fork

      • Fork that repo from your team org to your own GitHub account.
      • Create a PR to add a file yourName.md (e.g. jonhDoe.md containing a brief resume of yourself (branch → commit → push → create PR)
    3. For each PR: review, update, and merge.

      • A team member (not the PR author): Review the PR by adding comments (can be just dummy comments).
      • PR author: Update the PR by pushing more commits to it, to simulate updating the PR based on review comments.
      • Another team member: Merge the PR using the GitHub interface.
      • All members: Sync your local repo (and your fork) with upstream repo. In this case, your upstream repo is the repo in your team org.
    4. Create conflicting PRs.

      • Each team member: Create a PR to add yourself under the Team Members section in the README.md.
      • One member: in the master branch, remove John Doe and Jane Doe from the README.md, commit, and push to the main repo.
    5. Merge conflicting PRs one at a time. Before merging a PR, you’ll have to resolve conflicts. Steps:

      • [Optional] A member can inform the PR author (by posting a comment) that there is a conflict in the PR.
      • PR author: Pull the master branch from the repo in your team org. Merge the pulled master branch to your PR branch. Resolve the merge conflict that crops up during the merge. Push the updated PR branch to your fork.
      • Another member or the PR author: When GitHub does not indicate a conflict anymore, you can go ahead and merge the PR.

    W4.4i Project Management → Revision Control → Feature Branch Flow

    Can explain feature branch flow

    Feature branch workflow is similar to forking workflow except there are no forks. Everyone is pushing/pulling from the same remote repo. The phrase feature branch is used because each new feature (or bug fix, or any other modification) is done in a separate branch and merged to master branch when ready.

    W4.4j Project Management → Revision Control → Centralized Flow

    Can explain centralized flow

    The centralized workflow is similar to the feature branch workflow except all changes are done in the master branch.

    [W4.5] Regression testing of text UIs

    W4.5a Quality Assurance → Testing → Introduction → What

    Can explain testing

    Testing: Operating a system or component under specified conditions, observing or recording the results, and making an evaluation of some aspect of the system or component. –- source: IEEE

    When testing, we execute a set of test cases. A test case specifies how to perform a test. At a minimum, it specifies the input to the software under test (SUT) and the expected behavior.

    Example: A minimal test case for testing a browser:

    • Input – Start the browser using a blank page (vertical scrollbar disabled). Then, load longfile.html located in the test data folder.
    • Expected behavior – The scrollbar should be automatically enabled upon loading longfile.html.

    Test cases can be determined based on the specification, reviewing similar existing systems, or comparing to the past behavior of the SUT.

    Other details a test case can contain extra A more elaborate test case can have other details such as those given below.
    • A unique identifier : e.g. TC0034-a
    • A descriptive name: e.g. vertical scrollbar activation for long web pages
    • Objectives: e.g. to check whether the vertical scrollbar is correctly activated when a long web page is loaded to the browser
    • Classification information: e.g. priority - medium, category - UI features
    • Cleanup, if any: e.g. empty the browser cache.

    For each test case we do the following:

    1. Feed the input to the SUT
    2. Observe the actual output
    3. Compare actual output with the expected output

    A test case failure is a mismatch between the expected behavior and the actual behavior. A failure indicates a potential defect (or a bug), unless the error is in the test case itself.

    Example: In the browser example above, a test case failure is implied if the scrollbar remains disabled after loading longfile.html. The defect/bug causing that failure could be an uninitialized variable.

    A deeper look at the definition of testing extra

    Here is another definition of testing:

    Software testing consists of the dynamic verification that a program provides expected behaviors on a finite set of test cases, suitably selected from the usually infinite execution domain. -– source: Software Engineering Book of Knowledge V3

    Some things to note (indicated by keywords in the above definition):

    • Dynamic: Testing involves executing the software. It is not by examining the code statically.
    • Finite: In most non-trivial cases there are potentially infinite test scenarios but resource constraints dictate that we can test only a finite number of scenarios.
    • Selected: In most cases it is not possible to test all scenarios. That means we need to select what scenarios to test.
    • Expected: Testing requires some knowledge of how the software is expected to behave.

    Explain how the concepts of testing, test case, test failure, and defect are related to each other.

    W4.5b Quality Assurance → Testing → Regression Testing → What

    Can explain regression testing

    When we modify a system, the modification may result in some unintended and undesirable effects on the system. Such an effect is called a regression.

    Regression testing is the re-testing of the software to detect regressions. Note that to detect regressions, we need to retest all related components, even if they had been tested before.

    Regression testing is more effective when it is done frequently, after each small change. However, doing so can be prohibitively expensive if testing is done manually. Hence, regression testing is more practical when it is automated.

    Regression testing is the automated re-testing of a software after it has been modified.

    c.

    Explanation: Regression testing need not be automated but automation is highly recommended.

    Explain why and when you would do regression testing in a software project.

    W4.5c Quality Assurance → Testing → Test Automation → What

    Can explain test automation

    An automated test case can be run programmatically and the result of the test case (pass or fail) is determined programmatically. Compared to manual testing, automated testing reduces the effort required to run tests repeatedly and increases precision of testing (because manual testing is susceptible to human errors).

    W4.5d Quality Assurance → Testing → Test Automation → Automated Testing of CLI Apps

    Can semi-automate testing of CLIs

    A simple way to semi-automate testing of a CLI(Command Line Interface) app is by using input/output re-direction.

    • First, we feed the app with a sequence of test inputs that is stored in a file while redirecting the output to another file.
    • Next, we compare the actual output file with another file containing the expected output.

    Let us assume we are testing a CLI app called AddressBook. Here are the detailed steps:

    1. Store the test input in the text file input.txt.

      add Valid Name p/12345 valid@email.butNoPrefix
      add Valid Name 12345 e/valid@email.butPhonePrefixMissing
      
    2. Store the output we expect from the SUT in another text file expected.txt.

      Command: || [add Valid Name p/12345 valid@email.butNoPrefix]
      Invalid command format: add 
      
      Command: || [add Valid Name 12345 e/valid@email.butPhonePrefixMissing]
      Invalid command format: add 
      
    3. Run the program as given below, which will redirect the text in input.txt as the input to AddressBook and similarly, will redirect the output of AddressBook to a text file output.txt. Note that this does not require any code changes to AddressBook.

      java AddressBook < input.txt > output.txt
      
      • The way to run a CLI program differs based on the language.
        e.g., In Python, assuming the code is in AddressBook.py file, use the command
        python AddressBook.py < input.txt > output.txt

      • If you are using Windows, use a normal command window to run the app, not a Power Shell window.

      More on the > operator and the < operator extra

      A CLI program takes input from the keyboard and outputs to the console. That is because those two are default input and output streams, respectively. But you can change that behavior using < and > operators. For example, if you run AddressBook in a command window, the output will be shown in the console, but if you run it like this,

      java AddressBook > output.txt 
      

      the Operating System then creates a file output.txt and stores the output in that file instead of displaying it in the console. No file I/O coding is required. Similarly, adding < input.txt (or any other filename) makes the OS redirect the contents of the file as input to the program, as if the user typed the content of the file one line at a time.

      Resources:

    4. Next, we compare output.txt with the expected.txt. This can be done using a utility such as Windows FC (i.e. File Compare) command, Unix diff command, or a GUI tool such as WinMerge.

      FC output.txt expected.txt
      

    Note that the above technique is only suitable when testing CLI apps, and only if the exact output can be predetermined. If the output varies from one run to the other (e.g. it contains a time stamp), this technique will not work. In those cases we need more sophisticated ways of automating tests.

    CLI App: An application that has a Command Line Interface. i.e. user interacts with the app by typing in commands.